
How to make your order numbers sequential in WooCommerce? Or, maybe you are migrating orders between two WooCommerce sites and need to align the order number?
The Sequential Order Numbers plugin allows you to set incremental order numbers rather than random numbers based on the post_id.
Additionally, this plugin enables you to set an order starting number (i.e. 724), custom label your order prefix/suffix (i.e. WC-1001-UK), and most importantly, keep the same order numbers during a WooCommerce site migration. For example, after migrating Order 339 from Site A to Site B the order shows as Order 339.
In this guide, you will learn best practices for setting up sequential order numbers on your WooCommerce site.
If you have not done so already, purchase and download the Sequential Order Numbers Pro plugin.
Note, this post will go through an example of using the Sequential Order Number plugin for purposes of your site migration. If you’d like to learn more about migrating your products, customers, and orders, please visit this blog post: How To Migrate WooCommerce Customers and Orders (Like A Pro!).
Let’s get started!
- Activate Sequential Order Number plugin on Site A
- Export Orders from Site A
- Activate Sequential Order Number plugin on Site B
- Import Orders to Site B
- Scenario A: Launched Site B Before Migrating All Historical Orders
- Scenario B: Launched Site B Before Migrating Some Historical Orders
- Docs
1. Activate Sequential Order Number plugin on Site A
First, go to Site A and upload and activate the Sequential Order Numbers Pro plugin.
In part 2, we will be exporting your orders from Site A.
If you are more of a visual learner, see how to set up and use this plugin with this video:
2. Export Orders from Site A
The first step is to purchase, download and activate the Customer / Order CSV Export plugin on Site A.
Next, on your WordPress dashboard, hover over WooCommerce and click “CSV Export”, and then click the “Export” tab and click the Export button.
Finally, when the export is done, click the “Export list” tab and download the exported Orders CSV file.
3. Activate Sequential Order Number plugin on Site B
Next, go to Site B and upload and activate the Sequential Order Numbers Pro plugin.
Note, that no configuration is required for this plugin after activation as orders will automatically be numbered beginning at 1 for new sites with no orders, and orders will pick up. from the largest order number for sites with existing orders.
If you’d like to configure settings such as customizing the order number start or setting an order number prefix/suffix, this can be found by hovering over your dashboard, click
Optional configuration settings to customize the order number can be found by navigating to your WordPress dashboard, and hover over WooCommerce, click “settings” and then toggle the tab that says “General”.
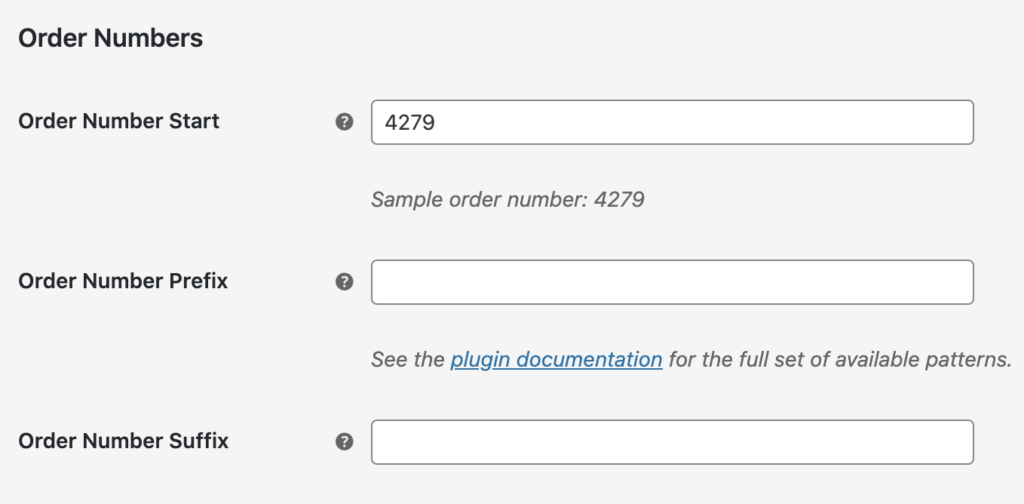
Pro tip > Order Number Start: If you’d like to enter in an Order Number Start, note that this is the starting number for any newly placed orders. This can be used to start order numbering at an arbitrary point (ie 4279) as long as it is higher than the current largest order number, or can be used to advance the order number in a shop with existing orders. For instance, if the current highest order number is 999 and this is set to 4279, the next orders placed will be: 4280, 4281, 4282, etc.
In part 4, we will be importing orders from Site A into Site B.
4. Import Orders to Site B
The next step is to purchase, download and activate the Customer / Order CSV Import Suite plugin on Site B.
Before importing your orders, I would highly recommend doing the following: Taking a backup of Site B. and Activate the Disable Emails plugin.
Step 1
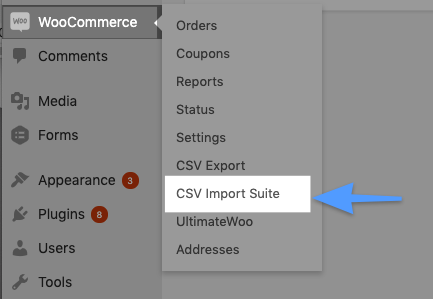
First, navigate to Site B and on your WordPress dashboard hover over WooCommerce, click “CSV Import Suite”.
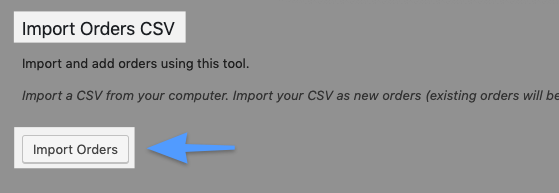
Then click “Import Orders”.
Step 2
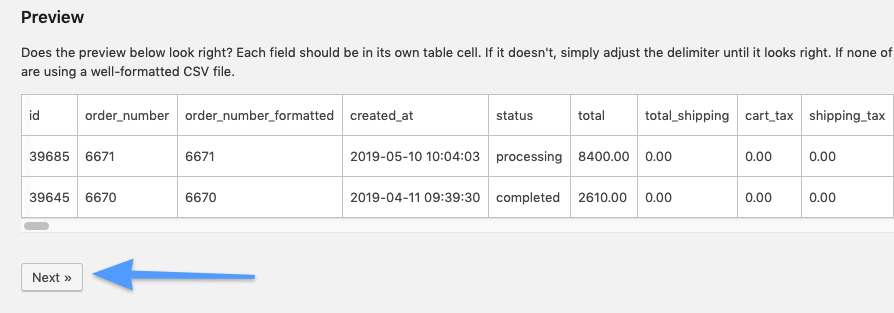
Next, upload your Orders CSV file, click “Next” and configure the options.
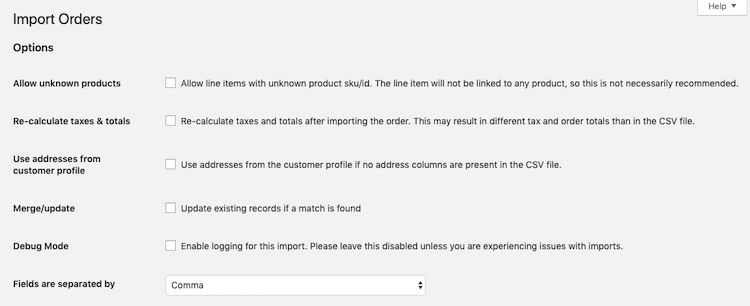
When finished, click “Next”.
Pro tip: If your product SKUs have changed and want to import products with an updated SKU, open up your Orders CSV file, and run a search and replace on the product SKUs that have been updated before importing your orders.
Step 3
Then, make sure your Orders CSV file is mapped properly. Because you are migrating sequential orders, make sure to skip the first column “id” in the file mapping. Why? This is so the order_number and order_number_formatted fields within the imported order numbers file display the correct Order Number rather than the post_id.
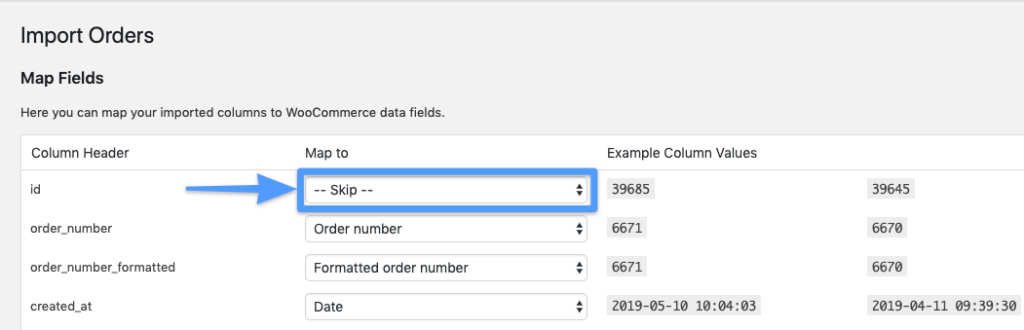
The first 3 columns imported should be:
id- order_number
- order_number_formatted
- created_at
When finished, click “Next”.
Step 4
Finally, click run as a “Dry Run” and if everything went smoothly, click “Run a live import now”.
Finally, do a 2-3 live transactions on Site B and navigate to the “Orders” dashboard in WooCommerce. You should see that the orders are ascending (most recent order has the highest order number). For instance: Order #4280 (16 minutes ago), Order #4281 (10 minutes ago), Order #4282 (4 minutes ago), and so forth.
Congratulations! You have migrated your orders from Site A to Site B while keeping the same order numbers!
5. Scenario A: Launched Site B Before Migrating All Historical Orders
Example 1
I have 500 historical orders on Site A. I will not be able to migrate my 500 historical orders from my staging site (Site A) before I launch my new site (Site B).
Site A (Historical Orders): Min Order – Max Order
- Starting Order #: 1001
- Ending Order #: 1500
Example 1 Solution Steps:
- Site B: Set the Custom Starting Order Number to the following: 1501 and higher (Remember, you’re able to choose any starting number that’s higher than your most current order number)
- Site B: Launch Site B
- Site A: Export the following order #s from Site A: 1001 – 1500
- Site B: Import the following orders #s to Site B: 1001 – 1500
- Site B: Do 3 test orders on the live site.
- Site B: Confirm the 3 test orders had the following order numbers: 1501, 1502, 1503
Example 2
I have 503 historical orders on Site A. I will not be able to migrate my 503 historical orders from my staging site (Site A) before I launch my new site (Site B).
Site A (Historical Orders): Min Order – Max Order
- Starting Order #: 1001
- Ending Order #: 1500
- Other Order #s: 1871, 1923, 2384
Example 2A Solution Steps:
- Site B: Set the Custom Starting Order Number to the following: 2385 and higher (Remember, you’re able to choose any starting number that’s higher than your most current order number)
- Site B: Launch Site B
- Site A: Export the following order #s from Site A: 1001 – 1500, 1871, 1923, 2384
- Site B: Import the following orders #s to Site B: 1001 – 1500, 1871, 1923, 2384
- Site B: Do 3 test orders on the live site.
- Site B: Confirm the 3 test orders had the following order numbers: 2385, 2386, 2387
Example 2B Solution Steps: (Rename outlier order numbers > “1871 to “”1501”)
- Site B: Set the Custom Starting Order Number to the following: 1504 and higher (Remember, you’re able to choose any starting number that’s higher than your most current order number)
- Site B: Launch Site B
- Site A: Export the following order #s from Site A: 1001 – 1500
- Site B: Import the following orders #s to Site B: 1001 – 1500
- Site A: Export the following order #s from Site A (1871, 1923, 2384) into a CSV file. Then upload the csv file into Google Drive and rename the orders to the following:
- “1871” to “1501”
- “1923” to “1502”
- “2384” to “1502”
- Site B: Import the following orders #s to Site B: 1501, 1502, 1503
- Site B: Do 3 test orders on the live site.
- Site B: Confirm the 3 test orders had the following order numbers: 1504, 1505, 1506
Example 2C Solution Steps: (Insert Prefix before outlier order numbers > “1871 to “”WC-1871”)
- Site B: Set the Custom Starting Order Number to the following: 1501 and higher (Remember, you’re able to choose any starting number that’s higher than your most current order number)
- Site B: Launch Site B
- Site A: Export the following order #s from Site A: 1001 – 1500
- Site B: Import the following orders #s to Site B: 1001 – 1500
- Site A: Export the following order #s from Site A (1871, 1923, 2384) into a CSV file. Then upload the csv file into Google Drive and rename the orders to the following:
- “1871” to “WC-1871”
- “1923” to “WC-1923”
- “2384” to “WC-2384”
- Site B: Import the following orders #s to Site B: WC-1871, WC-1923, WC-2384
- Site B: Do 3 test orders on the live site.
- Site B: Confirm the 3 test orders had the following order numbers: 1501, 1502, 1503
6. Scenario A: Launched Site B Before Migrating Some Historical Orders
Example 1
I have 500 historical orders on Site A. I will not be able to migrate my 500 historical orders from my staging site (Site A) before I launch my new site (Site B). However, I was able to migrate 250 of the 500 orders from Site A to Site B.
Site A (Historical Orders): Min Order – Max Order
- Starting Order #: 1001
- Ending Order #: 1500
Example 1 Solution Steps:
- Site A: Export the following order #s from Site A: 1001 – 1250
- Site B: Import the following orders #s to Site B: 1001 – 1250
- Site B: Set the Custom Starting Order Number to the following: 1501 and higher (Remember, you’re able to choose any starting number that’s higher than your most current order number)
- Site B: Launch Site B
- Site A: Export the following order #s from Site A: 1251 – 1500
- Site B: Import the following orders #s to Site B: 1251 – 1500
- Site B: Do 3 test orders on the live site.
- Site B: Confirm the 3 test orders had the following order numbers: 1501, 1502, 1503
Example 2
I will not be able to migrate my 503 historical orders from my staging site (Site A) before I launch my new site (Site B). However, I was able to migrate 250 of the 503 orders from Site A to Site B.
Site A (Historical Orders): Min Order – Max Order
- Starting Order #: 1001
- Ending Order #: 1500
- Other Order #s: 1871, 1923, 2384
Example 2A Solution Steps:
- Site A: Export the following order #s from Site A: 1001 – 1250
- Site B: Import the following orders #s to Site B: 1001 – 1250
- Site B: Set the Custom Starting Order Number to the following: 2385 and higher (Remember, you’re able to choose any starting number that’s higher than your most current order number)
- Site B: Launch Site B
- Site A: Export the following order #s from Site A: 1251 – 1500, 1871, 1923, 2384
- Site B: Import the following orders #s to Site B: 1251 – 1500, 1871, 1923, 2384
- Site B: Do 3 test orders on the live site.
- Site B: Confirm the 3 test orders had the following order numbers: 2385, 2386, 2387
Example 2B Solution Steps: (Rename outlier order numbers > “1871 to “”1501”)
- Site A: Export the following order #s from Site A: 1001 – 1250
- Site B: Import the following orders #s to Site B: 1001 – 1250
- Site B: Set the Custom Starting Order Number to the following: 1504 and higher (Remember, you’re able to choose any starting number that’s higher than your most current order number)
- Site B: Launch Site B
- Site A: Export the following order #s from Site A: 1251 – 1500
- Site B: Import the following orders #s to Site B: 1251 – 1500
- Site A: Export the following order #s from Site A (1871, 1923, 2384) into a CSV file. Then upload the csv file into Google Drive and rename the orders to the following:
- “1871” to “1501”
- “1923” to “1502”
- “2384” to “1502”
- Site B: Import the following orders #s to Site B: 1501, 1502, 1503
- Site B: Do 3 test orders on the live site.
- Site B: Confirm the 3 test orders had the following order numbers: 1504, 1505, 1506
Example 2C Solution Steps: (Insert Prefix before outlier order numbers > “1871 to “”WC-1871”)
- Site A: Export the following order #s from Site A: 1001 – 1250
- Site B: Import the following orders #s to Site B: 1001 – 1250
- Site B: Set the Custom Starting Order Number to the following: 1501 and higher (Remember, you’re able to choose any starting number that’s higher than your most current order number)
- Site B: Launch Site B
- Site A: Export the following order #s from Site A: 1251 – 1500
- Site B: Import the following orders #s to Site B: 1251 – 1500
- Site A: Export the following order #s from Site A (1871, 1923, 2384) into a CSV file. Then upload the csv file into Google Drive and rename the orders to the following:
- “1871” to “WC-1871”
- “1923” to “WC-1923”
- “2384” to “WC-2384”
- Site B: Import the following orders #s to Site B: WC-1871, WC-1923, WC-2384
- Site B: Do 3 test orders on the live site.
- Site B: Confirm the 3 test orders had the following order numbers: 1501, 1502, 1503
Hi there,
I’ve already looked at the plugin. But that doesn’t solve my problem. It’s about: I use German Market for my web shop and the standard order number is okay because the invoice number is important to me.
At the same time, I also have a POS that is supposed to generate receipt numbers. The “official” WooCommerce POS plugin does not allow this but also uses the standard order number (Post-ID) as the receipt number.
Basically, you should be able to generate different number ranges. One for online invoices (German market does that) and one for receipts so that there are no jumps in the receipt numbers.
Is there a solution for this?